loT + AI + Cloud = Edge computing.
This is my understanding of edge computing. As the raising of loT, more and more AI work will be dedicated to the local machines, they may be weaker than the central cloud, but it provides significantly quicker reaction.
Frankly, I only have experience to install the models on raspberry Pi 3 which can be seem as a standalone system. In the real world, there are hundreds of endpoints, it is impossible to maintain them separately, and there is also existing communication between endpoints and cloud to transmit data.
Azure gives its own solution called Azure loT Edge. It builds on the top of loT hub(an bi-direction instant message control component )and has three major components: loT module, loT runtime and cloud interface. Let’s figure out some concepts first, then we tried to build a real systems.
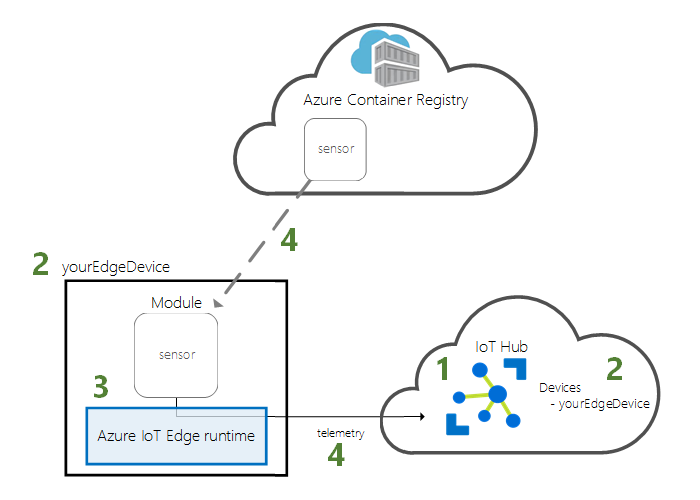
loT hub: is a managed service, hosted in the cloud, that acts as a central message hub for bi-directional communication between your IoT application and the devices it manages. It provides a interface to manage all the loT edge devices and all the modules for delivery to devices.
loT runtime: hosted on device, has two responsibilities: communication and manage modules. These two roles are performed by two parts: loT edge hub and loT agent. loT edge hub takes responsibility of communication between loT hub and loT device and between loT modules, so we can consider loT edge hub is a local proxy for loT hub. loT agent runs and monitors modules on the device.
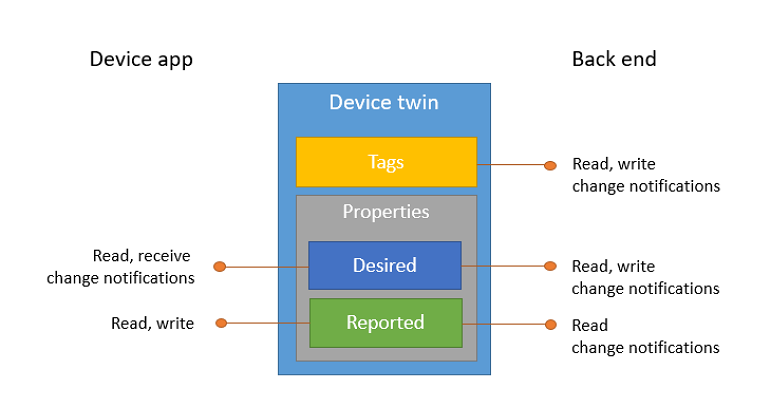
loT module: is the smallest unit to achieve the business logic on the device. It could be Azure service( AI, Azure function etc.) or the custom functions written by C#, java, python, node.js…. Modules are docker images pulled from Azure register service or Docker hub. The maximum number of modules is 20 in a single device. Each modules has four elements: docker image, instance, identity and twin. The instance is a running image on the device, identity is initialed when the instance created and it stored in loT hub(cloud) as well, in case we launch the communication between cloud and device. Twin is Json document contains some state information, like metadata, configuration and conditions. There are two types of properties in twin: desired properties and reported properties. They have different write/read authorities for device and cloud.
The last thing is deployment manifest, which is a Json document tells device which modules to install and how to configure them. Please find the detail in the comments(start with “//”) blew.
{
  "modulesContent": {
// $edgeAgent indicates the docker version
    "$edgeAgent": {
      "properties.desired": {
        "schemaVersion": "1.0",
        "runtime": {
          "type": "docker",
          "settings": {
            "minDockerVersion": "v1.25",
            "loggingOptions": "",
            "registryCredentials": {}
          }
        },
// system module includes information of imges of edgeAgent & edgeHub, "createOptions" indicates when to launch these images.
        "systemModules": {
          "edgeAgent": {
            "type": "docker",
            "settings": {
              "image": "mcr.microsoft.com/azureiotedge-agent:1.0.7",
              "createOptions": "{}"
            }
          },
          "edgeHub": {
            "type": "docker",
            "status": "running",
            "restartPolicy": "always",
            "settings": {
              "image": "mcr.microsoft.com/azureiotedge-hub:1.0.7",
              "createOptions": "{\"HostConfig\":{\"PortBindings\":{\"5671/tcp\":[{\"HostPort\":\"5671\"}],\"8883/tcp\":[{\"HostPort\":\"8883\"}],\"443/tcp\":[{\"HostPort\":\"443\"}]}}}"
            }
          }
        },
// modules includes all information about custom modules or Azure service
        "modules": {
          "camera-capture": {
            "version": "1.0",
            "type": "docker",
            "status": "running",
            "restartPolicy": "always",
            "settings": {
              "image": "glovebox/camera-capture-opencv:1.1.45-arm32v7",
              "createOptions": "{\"Env\":[\"Video=0\",\"azureSpeechServicesKey=2f57f2d9f1074faaa0e9484e1f1c08c1\",\"AiEndpoint=http://image-classifier-service:80/image\"],\"HostConfig\":{\"PortBindings\":{\"5678/tcp\":[{\"HostPort\":\"5678\"}]},\"Devices\":[{\"PathOnHost\":\"/dev/video0\",\"PathInContainer\":\"/dev/video0\",\"CgroupPermissions\":\"mrw\"},{\"PathOnHost\":\"/dev/snd\",\"PathInContainer\":\"/dev/snd\",\"CgroupPermissions\":\"mrw\"}]}}"
            }
          },
          "image-classifier-service": {
            "version": "1.0",
            "type": "docker",
            "status": "running",
            "restartPolicy": "always",
            "settings": {
              "image": "glovebox/image-classifier-service:1.1.4-arm32v7",
              "createOptions": "{\"HostConfig\":{\"Binds\":[\"/home/pi/images:/images\"],\"PortBindings\":{\"8000/tcp\":[{\"HostPort\":\"80\"}],\"5679/tcp\":[{\"HostPort\":\"5679\"}]}}}"
            }
          }
        }
      }
    },
// $edgeHub includes routers which is a data pipeline
    "$edgeHub": {
      "properties.desired": {
        "schemaVersion": "1.0",
        "routes": {
          "camera-capture": "FROM /messages/modules/camera-capture/outputs/output1 INTO $upstream"
        },
        "storeAndForwardConfiguration": {
          "timeToLiveSecs": 7200
        }
      }
    }
  }
}
Let’s start to do a demo step by step.
- Create a loT hub. There are three ways to create a loT hub. One is through the Azure portal, the second through the CLI, the third through vs code.
// through CLI
az iot hub create --resource-group {resource group name} --name {hub_name} 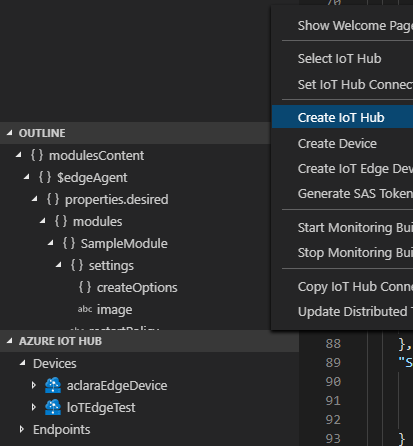
- Register an loT Edge device in the loT hub. In this step, we actually do nothing for the device. We create the device ID and connect string for using later.
// through CLI
az iot hub device-identity create --hub-name {hub_name} --device-id myEdgeDevice --edge-enabled
az iot hub device-identity show-connection-string --device-id myEdgeDevice --hub-name {hub_name}
// connection string will be created
"connectionString": "HostName={host name};DeviceId=loTEdgeTest;SharedAccessKey=Hn/60BimXvYBM16y0hgwZtGtcERG+FQI0FEFUtVCiXA="

- Install loT runtime and manage the device. Depending on the environment, we can install loT runtime on Linux or Linux containers on Windows. (sorry, I think few windows loT device existing). Linux container on windows is usually used for developing and testing in local, it is very easy to configure since everything done in the image, you can find the steps here. We am going through the how to set up in Linux.
// register repository for Ubuntu server 18.04
curl https://packages.microsoft.com/config/ubuntu/18.04/multiarch/prod.list > ./microsoft-prod.list
// copy list to container list
sudo cp ./microsoft-prod.list /etc/apt/sources.list.d/
// install Microsoft GPG public key
curl https://packages.microsoft.com/keys/microsoft.asc | gpg --dearmor > microsoft.gpg
sudo cp ./microsoft.gpg /etc/apt/trusted.gpg.d/

//install container runtime
sudo apt-get update
sudo apt-get install moby-engine
sudo apt-get install moby-cli

// install lot edge security daemon
// security daemon is used for launching edge hub and edge agent
sudo apt-get update
sudo apt-get install iotedge

// manual provision
// set up the connection string you got in previous step
sudo nano /etc/iotedge/config.yaml
# Manual provisioning configuration
provisioning:
  source: "manual"
  device_connection_string: "<ADD DEVICE CONNECTION STRING HERE>"

// verify the installation
sudo systemctl restart iotedge
sudo iotedge list
There is another automatic method to manage the devices, called DPS(Device provisioning Service). But I am planing to talk about it as a new topic.
- Developing module. As we know, each module is an image located on cloud register or local. Then it is deployed through loT hub to loT edge device. Fortunately, Microsoft has provided an integrated solution in Visual Studio Code. We mostly can do everything in vs code, rather than switch back and forth. Before we start, we need install some extensions for vs code: Azure IoT Tools , Docker extension, Azure IoT EdgeHub Dev Tool, and Visual Studio extension(s) specific to the language( I installed Python extension and C# extension ). Don’t forget to install common language environment: .net core or python, pip…..

When you creating a module, you have to provide module’s image repository. It could be Azure container registry( <registry name>.azurecr.io/<module name> ) or local address ( localhost:5000/ <module name> )
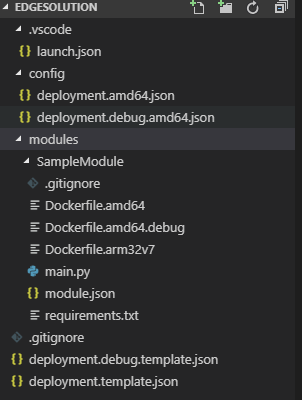
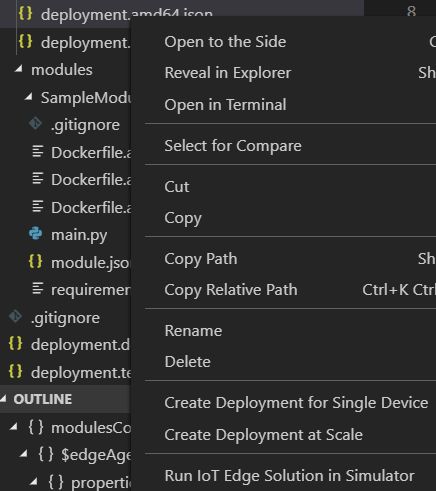
launch.json is debug configuration, config folder is the deployment manifest. modules folder has subfolders for each module, module.json file defines the Docker build process, the module version, and your docker registry, updating the version number, pushing the updated module to an image registry, and updating the deployment manifest for an edge device triggers the Azure IoT Edge runtime to pull down the new module to the edge device; deployment.template.json file is used for build process, define what module to build, what router used and what version of runtime. If you right click this file, you can find the option to create deployment manifest.

- Test and Deployment. We can deploy the module to local docker container by right click” deployment.template.json ” and choose “build and push loT edge solution”(or simulator)

Deployment is easy as well. right click the json file under config folder(this json file is generate by tempalte.json). choose “create deployment for single device”, then choose device ID to finish single device deployment.
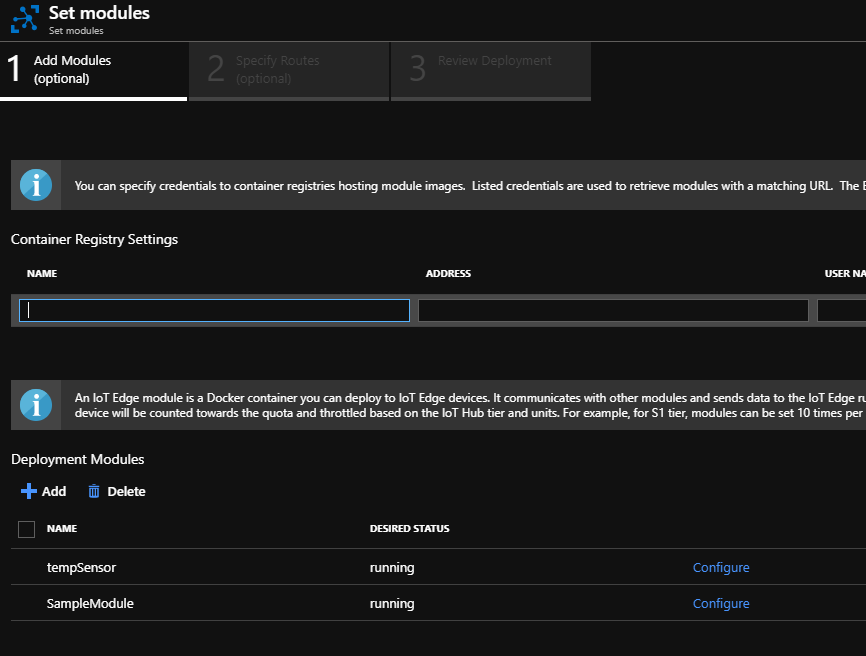
- Manage device and module on Cloud. If you already upload the module to cloud container registry. I can deploy instantly through Azure portal and this process is automatically.
Next time, I will try to deploy an image classification module to raspberry(or Linux virtual machine) to achieve a simple edge machine learning.
Reference:
Quickstart: Deploy your first IoT Edge module to a Linux device, https://docs.microsoft.com/en-us/azure/iot-edge/quickstart-linux
Creating an image recognition solution with Azure IoT Edge and Azure Cognitive Services, https://dev.to/azure/creating-an-image-recognition-solution-with-azure-iot-edge-and-azure-cognitive-services-4n5i
loT EDGE document, https://docs.microsoft.com/en-us/azure/iot-edge/
Leave a Reply