Azure Pipeline is consist of two parts: pipeline and release. They represent
CI and CD separately.
- Build Pipeline – to build and test the code. The build creates an artifact that’s used by the rest of your pipeline to run tasks such as deploying to staging or production.
- Release Pipeline – once the code is updated, built and packaged, it can be deployed to target services using Release Pipelines.

Let’s talk about how to implement this process for Azure data factory. Before you start, I suppose your current ADF has matched these requirements (if not, please refer to here):
- You already have a Azure Repos.
- ADF is integrated with this Git Repos.
- A key Vault. which is used for storing database and datalake connection information, plus all configuration parameters for release.
The whole ADF CI/CD pipeline is like this:

Building Pipeline (CI)
- Create new pipeline, choose “adf_publish” for default branch
- “adf_publish” branch is created by ADF automatically, after you click “publish” in your ADF GUI.

- Add new Agent job
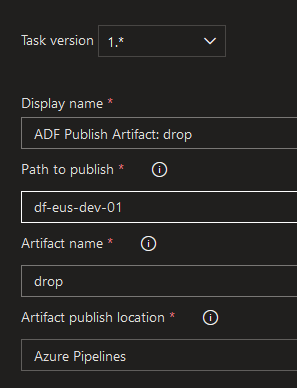
- search for “Data factory”, add a new publish artifacts
- set the path to publish(git path)
- set artifact publish location as Azure pipelines
Release Pipeline (CD)

So next step is deploying artifact into three environments: DEV, QA and PROD.

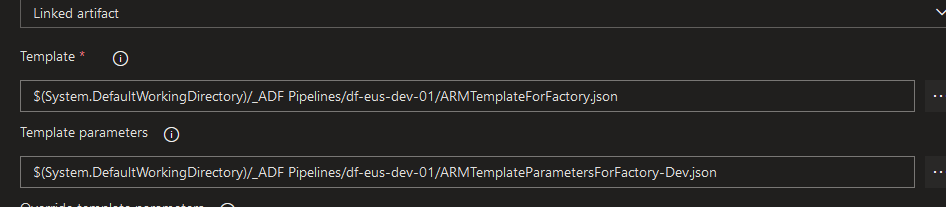
- Import Azure Key Vault. where you stored all the connection information. We would use these information in two areas.
- Release pipeline: get the basic information in each environment, e.g, database name, data lake name, etc. see the screenshot above.
- template parameters used in adf_publish.
- Set the Datafactory.
- Add a “Azure Resource group deployment”. where we need to focus one the template path.
You can also add trigger stop and start before and end of data factory job.
# stop trigger, you have to add variables for each release environment
$triggersADF = Get-AzDataFactoryV2Trigger -DataFactoryName $(DataFactoryName) -ResourceGroupName $(ResourceGroupName)

$triggersADF | ForEach-Object { Stop-AzDataFactoryV2Trigger -ResourceGroupName $(ResourceGroupName) -DataFactoryName $(DataFactoryName) -Name $_.name -Force }
# end trigger
$triggersADF = Get-AzDataFactoryV2Trigger -DataFactoryName $(DataFactoryName) -ResourceGroupName $(ResourceGroupName)
$triggersADF | ForEach-Object { Start-AzDataFactoryV2Trigger -ResourceGroupName $(ResourceGroupName) -DataFactoryName $(DataFactoryName) -Name $_.name -Force }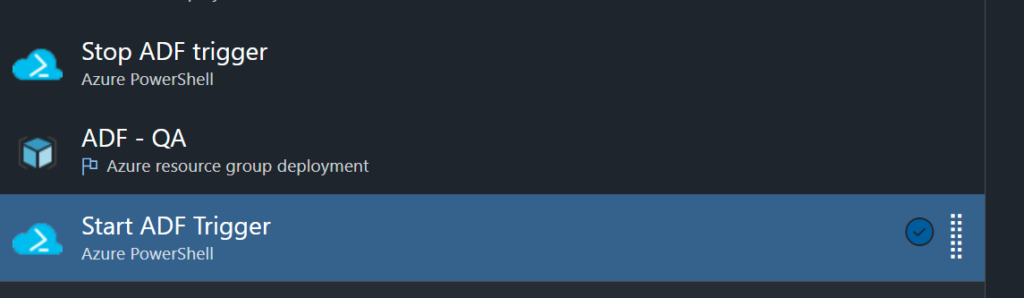
- How to set up adf_publish
- go back to azure repos.
- switch to adf_publish.
- create corresponding ARM parameter template for each environment. You can find an example blew.
{
	"$schema": "https://schema.management.azure.com/schemas/2015-01-01/deploymentParameters.json#",
	"contentVersion": "1.0.0.0",
	"parameters": {
		"factoryName": {
			"value": "datafactory name"
		},
		"LS_AKV_KeyVault_properties_typeProperties_baseUrl": {
			"value": "https://XXXXkeyvault.vault.azure.net/"
		},
		"LS_SQL_ConfigDb_properties_typeProperties_connectionString_secretName": {
			"value": "sqlconnection"
		},
		"LS_DLS_Datalake_properties_typeProperties_url": {
			"value": "https://XXXXXdatalake.dfs.core.windows.net/"
		}
	}
}
These three parameters are used for dynamic linked service. These three parameters are defined in ARMTemplateForFactory, and set the value in each seprated Json files. To define the parameters, you have to first go to “Parameterization template” table and edit it.

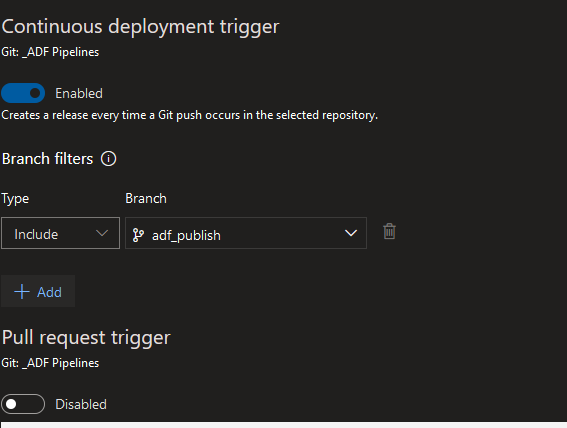
If we need enable Continuous deployment trigger , we have to link with adf_publish branch as well.

Reference:
Azure DevOps Pipelines. https://docs.microsoft.com/en-us/azure/devops/pipelines/?view=azure-devops
Continuous integration and delivery in Azure Data Factory. https://docs.microsoft.com/en-us/azure/data-factory/continuous-integration-deployment
Use Azure Key Vault to pass secure parameter value during deployment. https://docs.microsoft.com/en-us/azure/azure-resource-manager/templates/key-vault-parameter?tabs=azure-cli
Leave a Reply